Professional packaging does not require a logo printed across every box. Start with a suitable stock package, add a clear brand label, and include one useful insert. Then repeat the same visual choices across your orders. The goal is a package that looks intentional and is straightforward to open—not a pile of decorative extras.
For a small ecommerce business, this approach separates two decisions: which container the product needs and how the brand appears. You can change a label or card without redesigning the carton. However, stock packaging is not automatically the cheapest option. Compare current supplier quotes and your own packing work before making a cost claim.
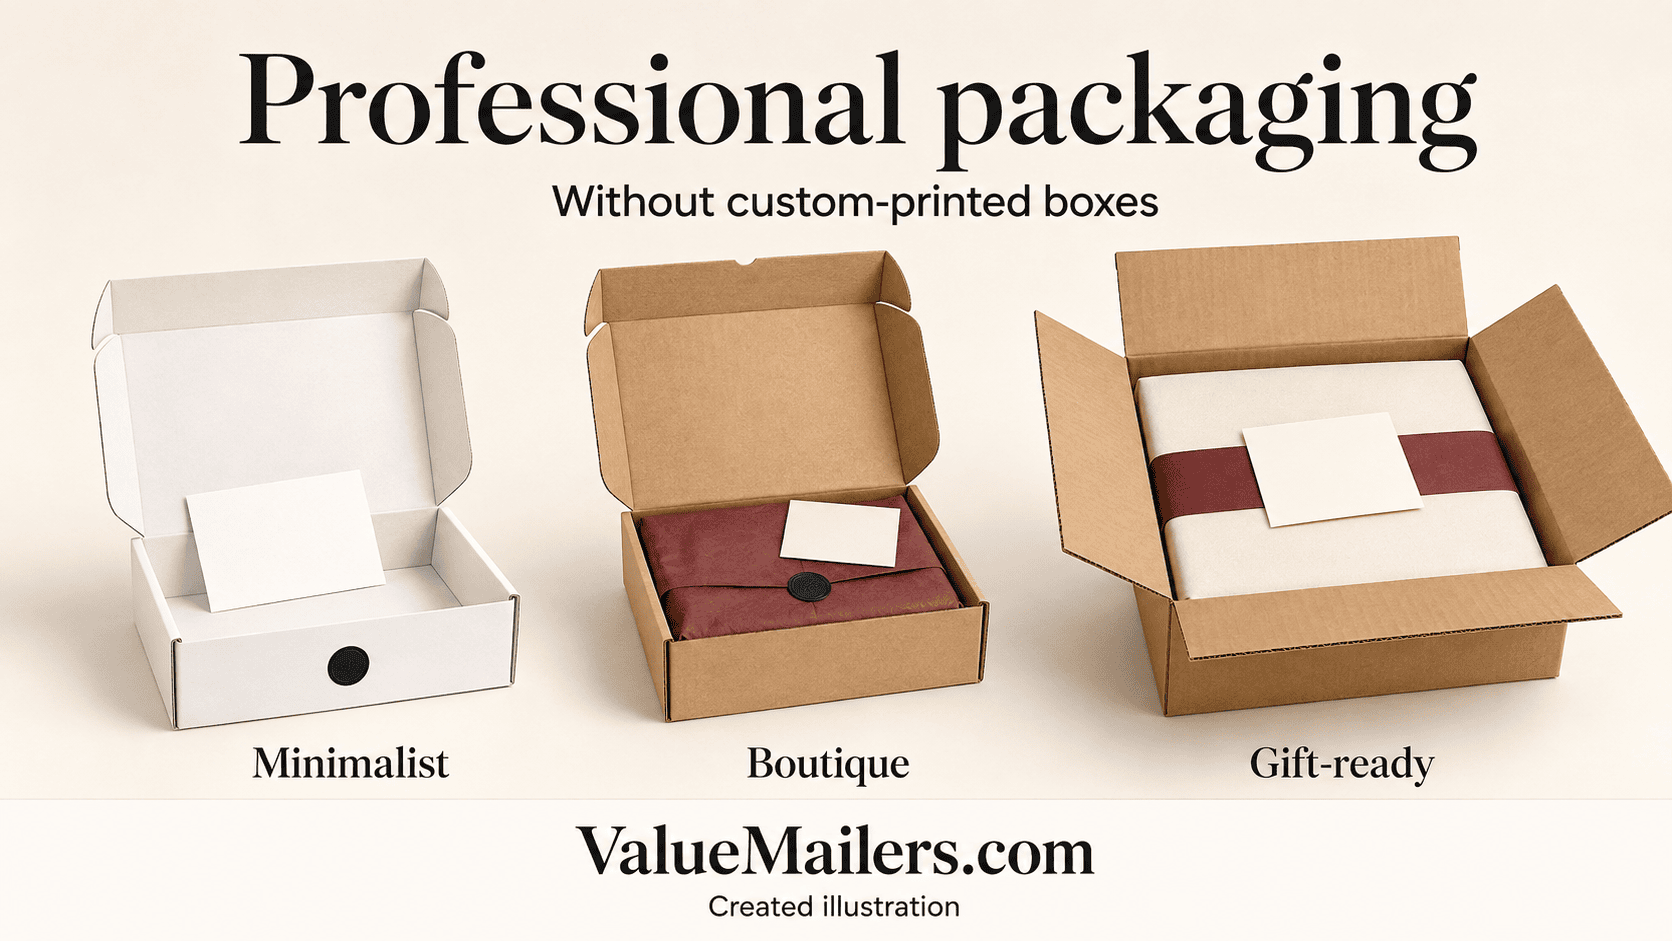
Below are three created concepts: minimalist, boutique, and gift-ready. They are styling ideas, not photographs of physical tests or exact ValueMailers product configurations. Select the dimensions, protective materials, and closure method for your actual shipment.
Build professional packaging around three repeatable choices
Choose a base, a visual accent, and a useful message. The base might be a white box, kraft box, or suitable mailer. The accent might be your existing logo on a label or one tissue color. The message belongs on a small card that answers a real customer question.
Use the logo and colors customers already see in your store. You do not need a new identity just for the packing bench. Keep text readable, leave space around the brand mark, and choose a label size that fits a clear panel without wrapping awkwardly around an edge.
These are three design choices, not a three-component limit. Protective cushioning, shipping tape, address labels, and required documents remain separate necessities. Never remove them to match a styled illustration.
Three professional packaging looks using stock boxes
| Look | Presentation recipe | Keep it practical |
|---|---|---|
| Minimalist | White or kraft stock box + restrained brand label + plain help card | Leave clear space; avoid extra wrapping added only for decoration. |
| Boutique | Stock box + one coordinated tissue color + tissue seal + care card | Use compatible tissue and keep the seal on the paper, not the product. |
| Gift-ready | Suitable plain outer package + neat interior presentation + gift message | Keep gift decoration inside; separate gift handling from ordinary orders. |
Look 1: Minimalist—let the product lead
Start with a plain box and a compact label using your existing brand mark. Inside, place the protected product neatly and add a simple card. A short thank-you plus a clear help destination can be enough. There is no need to put the logo on every surface.
Browse White Corrugated Boxes when a light-colored base suits your brand. Kraft can work just as well with a contrasting label. White and brown are visual choices here; color alone does not establish a box’s strength or suitability.
For compact orders, compare White Corrugated Mailer Boxes with the size of the fully protected product. Pick the structure first, then decide where the label goes. A neat layout should not depend on squeezing an item into a box that is too small.
Minimalist does not mean unfinished. Check for crooked labels, card text that is too small, and unnecessary layers that hide the product. A consistent label position is a more useful standard than a vague instruction to make the parcel look premium.
Look 2: Boutique—use one coordinated interior layer
Build the boutique look around tissue in a color that works with your existing identity. Fold it neatly over the protected item, place a small seal on the tissue, and add a care card where the customer can find it. Let that interior layer carry the visual accent.
Review Packing Tissue Paper specifications before choosing a sheet for direct contact with a product. Do not assume every paper is acid-free, colorfast, or appropriate for a delicate finish. The illustration’s colors are styling concepts, not a statement of current stock availability.
For delicate apparel, FedEx’s clothing guide recommends acid-free tissue or muslin between fabric layers. Follow the product maker’s care advice as well. Decorative tissue is not a substitute for the cushioning or rigid support a different product may need.
Keep the care card specific. A garment may need verified washing guidance; an accessory may need setup instructions. Use the manufacturer’s actual instructions, not generic advice copied across unrelated products. Keep adhesive off the item and any collectible or resale packaging.
Look 3: Gift-ready—put the surprise inside
A gift-ready order can use a plain shipping exterior with a coordinated presentation layer inside. Add the requested gift message and place it where the recipient will see it on opening. The outer parcel still needs a suitable structure, protective materials, secure closure, and a readable shipping label.
For a gift set that needs an outer carton, compare White Corrugated Shipping Boxes by dimensions and specifications. A presentation box is not automatically a shipping box. If it is intended only for display, protect it inside an appropriate shipping container.
Keep ribbons, loose decorations, and gift wrap inside that outer package. UPS packaging guidance advises against string and paper over-wrap and calls for suitable cushioning, shipping tape, and secure labels. A decorative seal does not replace the closure your parcel needs.
Set a clear gift-order rule: include the approved message, check spelling, and handle prices on customer-facing inserts according to your store’s gift policy. Do not remove invoices or other documents required for the shipment. Confirm the recipient’s order contents separately from the greeting.
Keep professional packaging consistent across boxes and mailers
Consistency means repeating recognizable design choices, not using one container for every product. Carry the same logo, accent color, type style, and help-card layout across the formats your business actually needs. Keep the product’s protection requirements in control.
For example, a suitably protected, low-risk item in Bubble Mailers can use the same visual identity as a boxed order. Keep the branding label on a clear area without interfering with the closure or shipping label. A padded mailer does not replace rigid protection for items that need it.
Inside a box, correctly selected Bubble Pouches can remain part of the protective plan even when tissue provides the presentation layer. If you purchase that product family as Bubble Out Bags, check the usable size and closure rather than assuming every listing is identical. Keep cushioning around the item instead of removing it for a cleaner-looking reveal.
A vinyl seller can carry the same brand label and help-card style onto Record Mailers. Keep the required record protection intact and place promotional material so it does not press against the sleeve. The design should adapt to the protective format, not force a record into an unsuitable gift box.
Make the insert useful before making it promotional
Choose one primary job for the insert. It might explain first use, point to verified care instructions, or tell the buyer how to get help. A thank-you line can sit alongside that information. Avoid stacking several cards that repeat the same sales message.
A simple content order is: thank-you, one relevant instruction, and a help destination. Use your real business contact information and current policies. If different products need different instructions, identify the card version clearly so the packer can select the right one.
Print a sample at the intended size and read it in ordinary light. Check contrast, small text, spelling, and every destination. If you use a QR code, test the printed code and include a readable web address as a backup. Do not use an AI-drawn QR pattern as a working code.
This stock-box approach can still involve printed stickers and cards. “Without custom-printed boxes” means the carton itself does not require custom printing. It is not a claim that all branding is print-free or that ValueMailers supplies a custom-printing service.
Give your packing team one clear styling standard
Write a short recipe for each approved order type. Name the stock container, protective packing method, label position, insert version, and any optional gift step. Keep a real sample or reference image at the station once you have checked the complete pack.
| Field | What to record |
|---|---|
| Order type | Which products and quantities this recipe covers |
| Container and protection | Exact supply references plus the approved protective packing method |
| Branding | Label design, size, and placement; tissue choice if used |
| Insert | Current card version and the order types that need it |
| Gift exception | Where the message goes and what changes for gift orders |
| Final check | Correct contents, secure closure, clear shipping label, readable insert |
Store presentation supplies in the order they are used. Keep outdated cards apart from approved versions. For example, do not leave last season’s promotion mixed with the everyday help card. A neutral year-round insert also lets you reserve seasonal changes for a small optional detail.
Keep Shipping Labels separate in purpose from brand stickers. Use supplies compatible with your printer and shipping system. Leave the address, barcode, and required markings clear; do not decorate over them or alter the carrier label’s layout.
Review professional packaging before rolling it out
Pack a sample using the actual product, all protective layers, and the final printed materials. Ask another person to open it and locate the instructions. Note where the tissue tears awkwardly, the card disappears, or the label placement makes opening unclear.
Then measure the full packing process yourself. Include assembling the container, adding protection, applying branding, inserting the correct card, sealing, and labeling. Compare the proposed presentation with your current method on comparable orders. An attractive mockup alone cannot establish how long the work takes.
Record material quantities and current supplier costs as well. There is no universal saving from stock boxes, and a decorative step has to earn its place in your workflow. Keep the version that meets your presentation goal without making the order confusing to pack or open.
Finally, validate the protective packing for the product and shipping conditions. A visual review is not transit testing. These created illustrations demonstrate styling only; they do not prove damage prevention, faster fulfillment, or higher repeat purchases.
Professional packaging questions
Do I need a custom-printed box to look professional?
No. A suitable stock box, a clear brand label, and a useful insert can form a coordinated presentation. The result depends on consistent execution and appropriate product protection, not the amount of printing.
Should every order include tissue and a gift card?
No. Use those elements when they serve the product or the customer’s request. A minimalist order may need only a brand label and relevant instructions. Make gift handling an explicit order option rather than an assumption.
Can I use the same label on every package?
You can repeat the design, but verify that its size and adhesive suit each surface. Keep it clear of the closure, carrier label, and required markings. Use a smaller version when needed instead of forcing a large sticker onto a narrow mailer.
Start with one repeatable look
Choose the minimalist, boutique, or gift-ready concept that fits your products and brand. Build one complete sample, check the printed details, and write down the packing recipe before expanding it. Professional packaging starts with a clear, consistent decision—not a custom-printed carton.